
Forking Kryptokrona
NB: This guide is deprecated and will not be updated anymore. See the latest version here
So you want to fork Kryptokrona, huh?
This guide will help you change the necessary sections of the code to set up your coin how you like it.
Firstly, lets quickly talk about licenses.
Licences
When you're poking around the codebase, you might see something like this:
// Copyright (c) 2012-2017, The CryptoNote developers, The Bytecoin developers
// Copyright (c) 2014-2018, The Monero Project
// Copyright (c) 2018, The TurtleCoin Developers
// Copyright (c) 2019-2020, Kryptokrona Developers
//
// Please see the included LICENSE file for more information.
At the top of each file. We ask when you fork us to make sure you leave these license headers intact. When we're programming on codebases like this, we're standing upon the shoulders of giants, and it's both polite, and a legal requirement of the licenses used, to credit the other contributors to the code.
As you may be aware, the CryptoNote white paper set out the initial specification for CryptoNote coins. The ByteCoin developers created the first implementation of this specification working closely with the CryptoNote developers, and this is what has become ByteCoin today. This was forked early on to become Bitmonero, and then Monero. The Monero developers have contributed back significant chunks of code to the original ByteCoin codebase, and of course, they maintain their own repositories and code.
The ForkNote Project was created as a fork of ByteCoin, to create a way to fork ByteCoin, easily by separating the needed constants and strings out into a separate file.
Kryptokrona then forked the Forknote Project and made our own changes, some of which were then contributed back to ForkNote.
So, make sure if you're doing a find and replace that all of these lines remain intact. You can of course start adding your own copyright line, for example,
Ok, now we understand about licenses, let's get the code!
The actual forking process
The easiest way to fork Kryptokrona, is to start by making a GitHub account. You can do this here if you don't have an account already.
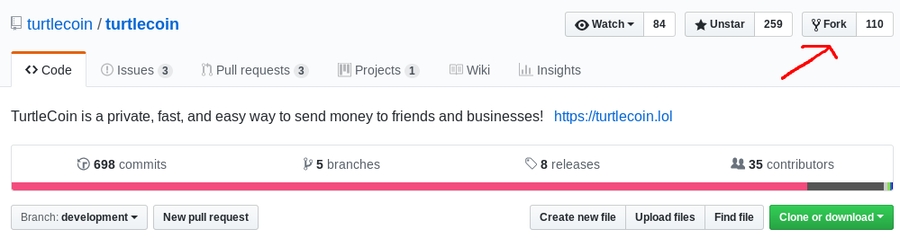
Make sure you're signed in. Next, head over to the Kryptokrona repo, and hit
Forkin the top right corner.It should look something like this:
Next, you want to get the source code on your computer. Head over to the repository you just forked, and click the
Clone or Downloadbutton. We want to clone the source code, so we can make changes, then push it back up to GitHub.It should look something like this:
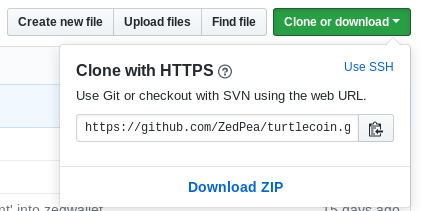
Now, take this URL shown, and copy it.
Next, you will need to download a git client. If you are a windows user, I would suggest Git for Windows, whilst if you are a Linux or Mac user, you should have this either already installed, or can install it from your repos or with brew.
Once you have opened up git bash or a terminal, you should be able to type
git clone URL, whereURLis the link you copied earlier, from GitHub.It should look something like this:
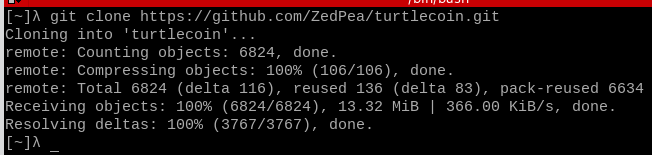
Great, now the code is on our computer. We're almost ready to start changing it!
Compiling
First, it might be a good idea to try compiling our code, so we can mess around with it later.
Just incase this guide gets outdated, you can always find the latest instructions on how to compile Kryptokrona on our GitHub.
Linux
Prerequisites
You will need a few dependencies for the build, most notably, cmake, make, gcc, g++, and boost.
On ubuntu:
sudo apt-get install -y build-essential python-dev gcc g++ git cmake libboost-all-dev
Building
cd Kryptokronamkdir buildcd buildcmake ..makeThe binaries will be placed in the
Kryptokrona/build/srcfolder.
Apple
Prerequisites
Ensure you have brew installed. If you don't, you can install it like so:
/usr/bin/ruby -e "$(curl -fsSL https://raw.githubusercontent.com/Homebrew/install/master/install)"Now we've got brew installed, we can install the dependencies.
brew install cmake boost
Building
cd Kryptokronamkdir buildcd buildcmake ..makeThe binaries will be placed in the
Kryptokrona/build/srcfolder.
Windows
Prerequisites
When installing Visual Studio, ensure you install
Desktop development with C++and theVC++ v140 toolchainwhen selecting features.The option to install the v140 toolchain can be found by expanding the
Desktop development with C++node on the right. You will need this for the project to build correctly.Install Boost 1.59.0, ensuring you download the installer for MSVC 14
Building
From the start menu, open
x64 Native Tools Command Prompt for vs2017cd <your_Kryptokrona_directory>mkdir buildcd buildSet the PATH variable for cmake: e.g.
set PATH="C:\Program Files (x86)\Microsoft Visual Studio\2017\Community\Common7\IDE\CommonExtensions\Microsoft\CMake\CMake\bin";%PATH%cmake -G "Visual Studio 14 Win64" .. -DBOOST_ROOT=C:/local/boost_1_59_0(Or your boost installed dir.)MSBuild Kryptokrona.sln /p:Configuration=Release /mThe binaries will be placed in the
Kryptokrona/build/src/Releasefolder.
Recompiling
Once you've compiled your code, you don't have to perform the full process above again.
There are two rules. If you've added a new file, or removed a file, you will have to remove the build folder, recreate it, then re-run cmake, and then re-run make (Or MSBuild).
If you've just changed code in a file, you just need to re-run make from the build folder. It will save bits which don't need to be recompiled, so this is a lot quicker most of the time.
Atomic Units
Next, I'd like to talk quickly about atomic units. You can skip this section if you're a pro already.
All of the constants in CryptoNoteConfig.h and most of the code, that refers to the actual amount of coins, is in Atomic Units.
What does this mean?
Well, if we're talking about Kryptokrona, we have 2 decimal places. That means, to get the atomic units of an amount of XKR, we need to multiply the amount by 100, or 10^2.
If we have 10.23 XKR, this is 1023 in atomic units. Atomic units have no decimal point, and so can be represented as an integer, in the code. Some different currencies have a special name for their atomic units, to make it easier to talk about. In Bitcoin, this is called a satoshi, and in Kryptokrona, it is called a shell.
Why is this helpful?
Computers are unable to accurately store floating point numbers (or, numbers with a decimal point), and so performing math on them is often problematic.
For example, let's say we want to split 10.00 XKR between 3 people. If you perform 10.00 / 3 in a programming language, you will probably see a result similar to 3.3333333333333335. Where did that 5 come from?! The computer is incapable of storing this number to its full amount of decimal places.
How do we fix this?
Now, let's demonstrate how we can solve this issue, with atomic units. Again, we have 10.00 XKR, and we want to split it between 3 people. Recall that to get the number of atomic units, we need to multiply by 100. So, we have a value of 1000 in atomic units. Now we can perform integer division instead. Let's perform 1000 / 3 - make sure you are using integral division in your programming language - and you should get a result of 333.
That's correct, each person can only get 333 units, or, if we want to convert back to XKR, 3.33 XKR. You might have noticed we're missing one atomic unit, or 0.01 XKR. We have to use remainders when dealing with atomic values, as one atomic unit cannot be split down anymore.
So, the code might look something like this, when using atomic units.
Usually, we will always use atomic units in our code, and only convert back to the expected representation with a decimal point when we print things to the user.
Ok, we know what atomic units are, lets go change some stuff!
Changing the name of your binaries, i.e. CMakeLists.txt
We're gonna start with some boring stuff - changing the name of your binaries.
Open up CMakeLists.txt in the src/ folder.
Note that there is also a CMakeLists.txt in the root directory, this is not the file you want!
The lines we want to be changing are at the very bottom of the file.
To change the name of a binary, change the final string in one of these lines. For example:
set_property(TARGET Kryptokrona PROPERTY OUTPUT_NAME "AppleCoind")
Save the file, and recompile.
Changing version numbers
Another boring one - changing the version numbers. This is the thing that appears when you start up Kryptokrona, e.g. Welcome to Kryptokrona v0.6.4.1264
Open up src/version.h.in.
The values are pretty self-explanatory. Set PROJECT_NAME to the name of your coin, PROJECT_SITE to your coins website, and PROJECT_COPYRIGHT to your copyright string.
Next, the version numbers.
APP_VER_MAJOR determines the first part of the version. You usually increment this value if you make a substantial change to your code, which potentially breaks APIs, wallet formats, blockchain formats, and so on.
APP_VER_MINOR determines the second number of the version. This is usually incremented for significant upgrades, such as hard forks.
APP_VER_BUILD determines the final number of the version. This is usually incremented for small changes, such as bug fixes, speedups, small wallet changes, and so on.
These numbers are then combined to form the full version number, in the format:
APP_VER_MAJOR.APP_VER_MINOR.APP_VER_BUILD.
For example, if we set the 3 values to 0, 6, and 4, we would end up with a version number of 0.6.4.
A good start for your project is 0.0.1, so
CryptoNoteConfig.h
Ok, now onto the fun stuff!
Open up the file CryptoNoteConfig.h, located in the src folder.
Let's start at the top. We'll only focus on the constants which need changing, as some of them are fine to keep as they are.
const uint64_t DIFFICULTY_TARGET = 30; // seconds
This is how fast you want blocks to be. In Kryptokrona, we have blocks on average every 30 seconds. If you wanted blocks to be every 2 minutes, you would set this to be:
const uint64_t DIFFICULTY_TARGET = 120; // seconds
const uint64_t CRYPTONOTE_PUBLIC_ADDRESS_BASE58_PREFIX = 3914525;
This defines what the addresses will start with. In Kryptokrona, this decodes to XKR.
So how do we get this prefix? We can use this handy tool.
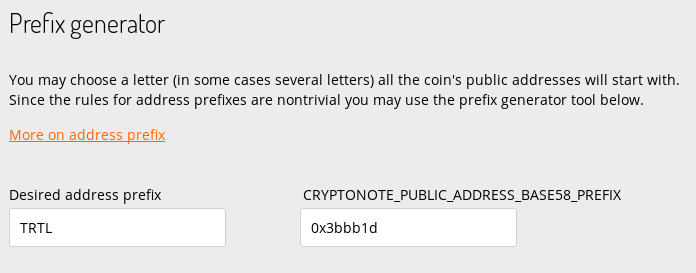
Scroll down to the prefix generator, and enter your desired address prefix. Note that some characters are disabled, so you may not be able to get the perfect prefix. For example, aPPLE is allowed, but APPLE isn't.
You may note that XKR's prefix is a number, while the output of this generator is not. These values are in hex format, and will automatically be decoded into a number when compiled, though you can use any standard hexadecimal to decimal converter to change the prefix into a number if you prefer.
So, if we wanted our prefix to be 'aPPLE', we would set this to be:
const uint64_t CRYPTONOTE_PUBLIC_ADDRESS_BASE58_PREFIX = 0x1e1f8cc7;
const uint32_t CRYPTONOTE_MINED_MONEY_UNLOCK_WINDOW = 40;
This value defines how many blocks need to be followed in the current chain before releasing the reward for mining a block for spending.
We would suggest you set this value to be roughly equal to 20 minutes - in Kryptokrona's case that's exactly what we have - 40 blocks * 30 seconds = 20 minutes.
If you have a block time of 2 minutes for example, we would set this value to 10.
const uint32_t CRYPTONOTE_MINED_MONEY_UNLOCK_WINDOW = 10;
const uint64_t MONEY_SUPPLY = UINT64_C(100000000000000);
This line is a pretty significant one. It determines the max supply of coins your cryptocurrency will have. In Kryptokrona, this is 1 trillion XKR, but as previously mentioned, all these values are in atomic units, so this value also includes the amount after the decimal point. Thus, this value is 1 trillion * 100, as Kryptokrona has 2 places after the decimal point.
Therefore, we suggest you decide how many decimal places your coin has, before filling in this value.
If you want your coin to have 6 decimal places, and the total supply to be ten thousand (10,000), the MONEY_SUPPLY value would be: 10^6 (or 1,000,000) * ten thousand (10,000) = 10000000000.
So, we would then pop this value in to give us:
const uint64_t MONEY_SUPPLY = UINT64_C(10000000000);
const uint32_t ZAWY_DIFFICULTY_BLOCK_INDEX = 187000;
This section will cover all of these, since they are all related:
These values set the heights where the different difficulty algorithms go live. A difficulty algorithm determines how hard it is to mine a block at a given height. If there are more people mining, it gets harder, and visa versa. This ensures blocks are found on average every 30 seconds (In XKR's case).
Difficulty algorithms are pretty hard to write, so we have quite a lot of revisions! We strongly suggest you use the latest version, to make you more resistant to pulse mining and timewarp attacks. The below section will activate each one at the first available block height, so you will be running the latest LWMA-2 by block 3.
const uint32_t ZAWY_DIFFICULTY_BLOCK_INDEX = 0;const uint32_t LWMA_2_DIFFICULTY_BLOCK_INDEX = 1;const uint32_t LWMA_2_DIFFICULTY_BLOCK_INDEX = 2;const uint32_t LWMA_2_DIFFICULTY_BLOCK_INDEX = 3;
const unsigned EMISSION_SPEED_FACTOR = 25;
This value defines how fast the maximum supply will be emitted. A smaller value means the supply will be emitted faster, and a higher values means it will take longer for the supply to be released. You can again use the website linked earlier to experiment with different values for the emission and how they will affect how long it takes for the supply to be distributed.
If we wanted a fast emission, we could set this to a value like 21.
const unsigned EMISSION_SPEED_FACTOR = 21;
const size_t CRYPTONOTE_DISPLAY_DECIMAL_POINT = 2;
This value defines how many numbers there are after the decimal point in your currency. In Kryptokrona, this value is 2, so we have amounts like 10.23 XKR. If we set this to 6, we would have an amount like 10.234567 XKR instead. Remember, as previously mentioned, this affects your money supply and other parameters which depend upon atomic units.
const size_t CRYPTONOTE_DISPLAY_DECIMAL_POINT = 6;
const uint64_t MINIMUM_FEE = UINT64_C(10);
This value defines what the minimum fee a user must spend to send a transaction is. Note this doesn't apply to fusion transactions.
A lower value allows cheaper transactions, but can mean your network can be spammed by lots of small transactions.
A happy medium is generally desired, though you could optionally raise this at a later date.
This value is defined again in atomic units, so multiply your desired minimum fee by 10 * the number of numbers after the decimal point in your coin.
const uint64_t MINIMUM_FEE = UINT64_C(1000);
const uint64_t MINIMUM_MIXIN_V1 = 0;
This section will cover all of these, because they are all related:
These set the mixin values that are allowed on the network, and at what height they are applied. If you want a private coin from the get-go, I would suggest setting MIXIN_LIMITS_V1_HEIGHT to 0, and MIXIN_LIMITS_V2_HEIGHT to 1. Then, set the MINIMUM_MIXIN_V1/V2 and MAXIMUM_MIXIN_V1/V2 values as appropriate.
Don't set a value that is too high, otherwise your network will have difficulty processing transactions. You shouldn't set the minimum anymore than 100, and sane values would be somewhere in the 0 - 30 range.
DEFAULT_MIXIN is used to set the mixin value used in zedwallet, so set it to a sane value.
Make sure your minimum is less than or equal to your maximum!
const uint64_t DEFAULT_DUST_THRESHOLD = UINT64_C(10);
This section will cover all of these, because they are all related:
The dust threshold determines the smallest amount that can be sent in a transaction, and can lead to lots of tiny amounts accumulating in your wallet which cannot be sent.
Setting the dust threshold to zero prevents this, but has a side effect of making transactions slightly bigger.
I suggest setting DUST_THRESHOLD_V2_HEIGHT to 0, to make small amounts always spendable.
const uint32_t DUST_THRESHOLD_V2_HEIGHT = 0;
const uint32_t UPGRADE_HEIGHT_V4 = 350000;
This value determines when the mining algorithm will transition to Original CryptoNight, also known as CN v0, to CryptoNight Lite v1, also known as CryptoNight Lite v7.
Original CN currently allows ASICs on the network, so we suggest you set this upgrade height to 3, to near instantly switch to the ASIC resistant CryptoNight Lite v1.
However, if you would prefer to stay on original CryptoNight, you can either find where this variable is used and patch it out, or, you can set the upgrade height to std::numeric_limits<uint32_t>::max()
(You will probably need to add #include <limits> to the top of the file if you choose this option)
const uint32_t UPGRADE_HEIGHT_V4 = 3; // Upgrade height for CN-Lite Variant 1 switch.
const uint64_t FORK_HEIGHTS[] =
This variable is used by the status command in zedwallet and Kryptokrona to notify users when a fork is upcoming, or their software is outdated. We suggest you set up some regular forks ahead of time, if you then need to update the software this will let users know when to expect this.
If you wish to not pre-prepare any forks, you can empty the list.
This will set the status command to notify of a fork at 100k and 300k blocks.
const uint8_t CURRENT_FORK_INDEX = FORK_HEIGHTS_SIZE == 0 ? 0 : 3;
This value relates to the previous FORK_HEIGHTS array. It determines which fork heights the software supports. (This value is zero-indexed). For example, if our FORK_HEIGHTS = {100, 200, 300} and CURRENT_FORK_INDEX = 1 then the software will support the fork at FORK_HEIGHTS[1] - which is the fork at 200 blocks.
We have a ternary to check FORK_HEIGHTS_SIZE so if you wish to empty the FORK_HEIGHTS array, you don't need to set a CURRENT_FORK_INDEX.
const uint8_t CURRENT_FORK_INDEX = FORK_HEIGHTS_SIZE == 0 ? 0 : 1;
const char CRYPTONOTE_NAME[] = "Kryptokrona";
This is an obvious one. It's the name of your coin!
const char CRYPTONOTE_NAME[] = "SuperCoolCoin";
const int P2P_DEFAULT_PORT and const int RPC_DEFAULT_PORT
These values define the ports that are used by the daemon to communicate. There is no real issue with using the same values as the Kryptokrona software, but if you are running both a Kryptokrona daemon and your own daemon, you would have to change the port one uses, as they will both need control over the port.
Ports can be in the range of 0 - 65535, however using ports in the 0 - 1023 range is not recommended, as on unix systems a program will require administrative permissions to use these ports.
const int P2P_DEFAULT_PORT = 10101;const int RPC_DEFAULT_PORT = 10102;
const static boost::uuids::uuid CRYPTONOTE_NETWORK =
This value sets the 'Network ID' of your coin. This ensures your network will not respond to network connections from other coins, such as Kryptokrona.
This value is using hex values, which should be in the form 0x?? where ? is a valid hex value (0-9, a-f).
const char* const SEED_NODES[] = {
This variable defines the seed nodes daemons will connect to on the very first launch, before they are aware of any peers. You will need to run these on different servers, to bootstrap other nodes. Once your coin is established, it might be a good idea to ask other trusted community members to host some seed nodes, to help decentralize your coin.
CryptoNoteCheckpoints.h
A nice quick job, we need to remove all the checkpoints in src/CryptoNoteCheckpoints.h
Checkpoints are used to verify that whilst syncing, you are on the right path, and not wasting your time syncing blocks from an incorrect daemon. It does this by matching a block hash to a block height.
This is all grand, however if you are creating a new chain, you will of course have new hashes for your blocks!
To fix it, just set const std::initializer_list<CheckpointData> CHECKPOINTS = {};
It would be a good idea to add some checkpoints here for your new chain when you're up and running.
WalletConfig.h
Next up to modify is WalletConfig.h, located in src/zedwallet/WalletConfig.h
These fields are all pretty well documented already, but we'll go over them anyway.
const std::string addressPrefix = "XKR";
This value is used to check inputted addresses are correct. This value corresponds to the value you chose for your address prefix earlier, in const uint64_t CRYPTONOTE_PUBLIC_ADDRESS_BASE58_PREFIX =
const std::string addressPrefix = "aPPLE";
const std::string ticker = "XKR";
This refers to the 'short name' your coin has, which is often used as a ticker on exchanges. For example, in Kryptokrona this is XKR, in Monero this is XMR, and in Bitcoin this is BTC.
const std::string ticker = "APPLE";
const std::string daemonName = "Kryptokrona";
This variable determines what the name of your daemon is. We'll talk about changing the names of the executables generated in the CmakeLists.txt section. We'll skip mentioning walletName, and walletdName as these both follow the same format.
const std::string daemonName = "AppleCoind";
const std::string contactLink = "http://chat.kryptokrona.se";
This value is used to let the user know where they can get support if their wallet gets stuck whilst syncing. In our case, this is the Kryptokrona discord. Maybe you have a forum or an IRC chat instead?
const std::string contactLink = "https://applecoin.com/livechat"
const long unsigned int standardAddressLength = 99;
This value is used to verify inputted addresses are correct. You can easily get this value by compiling, generating an address with zedwallet, and checking how long it is.
const long unsigned int addressLength = 100;
const long unsigned int integratedAddressLength = 236;
This value is used to verify inputted addresses are correct. An integrated address is an address which also contains an embedded payment ID, to alleviate users from having to remember to supply one with the transaction.
You can easily get this value by compiling, generating an address with zedwallet, then using the make_integrated_address command, and checking how long it is.
You can use your own address with this command, and any payment ID. If you don't know how to generate a payment ID, here's a random one for you to use.
8eba031ca60bf9b9f680309819bddf071e619c53ff71766e48e365812e229452
const long unsigned int integratedAddressLength = 237;
const uint64_t defaultMixin = CryptoNote::parameters::DEFAULT_MIXIN;
This sets the mixin value to be used with transactions. Make sure this is in the bounds you set earlier, with MINIMUM_MIXIN_V1/V2 and MAXIMUM_MIXIN_V1/V2.
const uint64_t defaultMixin = 7;
const uint64_t defaultFee = CryptoNote::parameters::MINIMUM_FEE
If you want to set a higher default fee, perhaps to make transactions go through quicker, you can do that here. As usual, this is in atomic units. You may also wish to change const uint64_t minimumFee = CryptoNote::parameters::MINIMUM_FEE; to prevent users from sending a lower fee than desired.
Remember this limit is only enforced by zedwallet, and the user can change the limit and recompile, or use a different wallet program. If you want to enforce higher fees across the network, change the value of CryptoNote::parameters::MINIMUM_FEE in CryptoNoteConfig.h.
const uint64_t defaultFee = 100;
const bool mixinZeroDisabled = true;
Is a mixin of zero allowed on the network? If at some point a mixin of zero will be disabled, but that point is at a later fork, still set this to true.
If you set this to true, you can change the value of
To determine what block height a mixin of zero gets disabled. In Kryptokrona's case, this was disabled at block 620k, but being a new network, you have the advantage of being able to disable a mixin of zero much earlier, or even from the launch of your network.
Again, this is only a client-side limitation. Ensure you have set your mixin limits in CryptoNoteConfig.h so that the network will enforce the mixin limits. Any ideas you always want to happen, need to be done at the network level, else custom daemons/wallets etc. can be written to avoid those ideas/limits.
If you want to allow zero mixins, then mixinZeroDisabledHeight does nothing.
Setup
Ok, so you've finished tweaking all the configs, and now you're ready to go! To start with, you will need to compile your code. See the compiling section below.
Make sure you've got the IPs of your seed nodes filled in in the config, 3 daemons need to be connected to the network for your coin to work.
Once you've compiled the code on all your machines, you can start up your daemon. If you are unable to connect to the seed nodes, you will see something like Failed to connect to seed nodes in your daemon output.
Ensure your firewalls are not preventing the daemon connection, you may need to open the p2p and RPC ports for the daemon, which by default are 11898 and 11897.
If your daemons are now talking to each other, you can start mining, and launch your blockchain!
You can use the solo mining miner executable for this. From a command prompt or terminal, launch the miner like so: miner --threads 1 --log-level 3 --address <your address>, replacing with an address you have generated and control.
You can, of course, increase the threads value, however as you are the only one currently mining on the network, there is not much point in that yet!
E.g.
If you've done this correctly, you should see output like this: Block successfully submitted, hash xxxx, and in your daemon window, you should see the New block detected value increasing in height.
Congratulations!
Compiling
You can always find the latest instructions on how to compile Kryptokrona on our GitHub.
Support, Questions?
Something not clear? Head over to our Discord and ask in the #help channel, and hopefully, someone will be able to help you out.
Let us know if something is wrong with this guide, or missing, so we can update it and make it better!
Good luck with your new coin!
Last updated